thibaut.demare@univ-lehavre.fr
28 - 30 April 2015
GraphStream Tutorials
Let's get some coding done
Thibaut Démare
LITIS - Université du Havre
NeX Days' 2015 - Agadir, Morocco
28 - 30 April 2015
Outlook
- Installation of GraphStream
- Tutorial 1: Basic tasks with GraphStream
- Tutorial 2: A first dynamic graph
Installation of GraphStream
Installation of GraphStream
Basic steps to install GraphStream
- Get a working java SDK installed
- Get Eclipse installed
- Get the GraphStream tutorial sources
- Get GraphStream binaries
Get Eclipse Installed
- Go to the Eclipse download page at:
https://eclipse.org/downloads/packages/eclipse-ide-java-developers/lunasr2 - On the right column, "Download Links", pick up your OS
- Click the download button
- Once downloaded, open the file. An
eclipse
folder is created. Move it somewhere safe.
Get the tutorial workspace
- Go to the tutorial page at github:
http://github.com/graphstream/gs-talk/tree/Nex2015 - Get the code:
- with the "Zip" button on github (will download an archive)
- or through git:
git clone -b NeX2015 git://github.com/graphstream/gs-talk.git
- In that project, we want the
Demos
folder.
Import into Eclipse
- Start Eclipse.
- When asked about a workspace, indicate a new workspace or any existing one.
- Go to menu
File > Import > General > Existing projects into workspace
. - Browse to the project (
Demos
folder), Eclipse should recognize the project. - Maven users: nothing to do here
Get GraphStream binaries
- Go to the GraphStream Download page:
http://graphstream-project.org/download/ - We need the 3 binaries of the last 1.3 release:
gs-algo-1.3.zip
,gs-core-1.3.zip
,gs-ui-1.3.zip
. - Extract those zip file, and copy
gs-algo-1.3.jar
,gs-core-1.3.jar
,gs-ui-1.3.jar
to thelib/
folder of the project. - In Eclipse, select the project in the right panel and refrech the project (F5 key).
- Right-clic on the project (
gs-talk-simtools
), thenproperties
, thenJava build path
(left panel), thenlibraries
(right panel), then clic theAdd jars
button, and select our 3 jar files in thegs-talk-simtools/lib
folder. - Maven :
mvn compile
Tutorial 1
Basic tasks with GraphStream
Create and display
src > org > graphstream > demo > tutorial1 > Tutorial1.java
import org.graphstream.graph.*;
import org.graphstream.graph.implementations.*;
public class Tutorial1 {
public static void main(String args[]) {
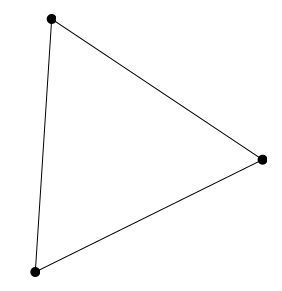
Graph graph = new SingleGraph("Tutorial 1");
graph.display();
graph.addNode("A");
graph.addNode("B");
graph.addEdge("AB", "A", "B");
graph.addNode("C");
graph.addEdge("BC", "B", "C", true); // Directed edge.
graph.addEdge("CA", "C", "A");
}
}
mvn exec:java -Dexec.mainClass="org.graphstream.demo.tutorial1.Tutorial1"
Basic tasks with GS
We can improve the display with some CSS:
...
graph.display();

graph.addAttribute("ui.quality");
graph.addAttribute("ui.antialias");
graph.addAttribute("ui.stylesheet",
	"edge { fill-color: grey; }");

graph.addNode("A");
...
Basic tasks with GS
- Each node, edge and attribute is identified by an unique string.
- The node and edge elements are created for you.
- You can access them however, when created:
Node n = graph.addNode("A"); - Or after creation:
Node n = graph.getNode("A");
Basic tasks with GS
- You can remove nodes and edges the same way:
graph.removeNode("A"); - You can change the graph this way at any time. Each change is considered as an “event”.
- The sequence of changes is seen as the dynamics of the graph.
- There are many other ways to modify the graph.
Basic tasks with GS
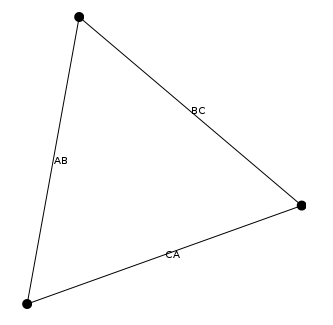
- Data stored in the graph, on nodes and edges, are called “attributes”.
- An attribute is a pair (name,value).
Edge ab = graph.getEdge("AB");
Edge bc = graph.getEdge("BC");
Edge ca = graph.getEdge("CA");

ab.setAttribute("ui.label", "AB");
bc.setAttribute("ui.label", "BC");
ca.setAttribute("ui.label", "CA");
Basic tasks with GS
- But you can add any kind of data on each graph element.
- However not all attributes appear in the viewer.
- Notice the way you can add arrays with
setAttribute()
and a variable number of arguments:
ab.setAttribute("aNumber", 10);
bc.setAttribute("anObject", new Double(10));
ca.setAttribute("anArrayOfThings", 1, 2, 3);
Basic tasks with GS
You can access attributes in several ways:
int value1 = ((Number) ab.getAttribute("aNumber")).intValue();
double value2 = bc.getAttribute("anObject");
Object[] value3 = ca.getAttribute("anArrayOfThings");
Special methods are here to simplify things:
double value4 = ab.getNumber("aNumber");
double value5 = bc.getNumber("anObject");
Basic tasks with GS
Travelling through all nodes of the graph is easy:
for(Node n: graph) {
	System.out.println(n.getId());
}
The same for edges:
for(Edge e: graph.getEachEdge()) {
	System.out.println(e.getId());
}
Basic tasks with GS
You can also do it with iterators:
Iterator<? extends Node> nodes = graph.getNodeIterator();

while(nodes.hasNext()) {
	System.out.println(nodes.next().getId());
}
The same for edges:
Iterator<? extends Edge> edges = graph.getEdgeIterator();

while(edges.hasNext()) {
	System.out.println(edges.next().getId());
}
Basic tasks with GS
Or even with indices:
int n = graph.getNodeCount();
for(int i=0; i<n; i++) {
	System.out.println(graph.getNode(i).getId());
}
The same for edges:
int n = graph.getEdgeCount();
for(int i=0; i<n; i++) {
	System.out.println(graph.getEdge(i).getId());
}
Be careful: indices remain the same as long as the graph is unchanged. But as soon as an addition or removal occurs, indices are no longer tied to their old node or edge.
Basic tasks with GS
You can also travel the graph using nodes:
import static org.graphstream.algorithm.Toolkit.*;
...
Node node = randomNode(graph);

for(Edge e : node.getEachEdge()) {
	System.out.printf("neighbor %s via %s%n",
		e.getOpposite(node).getId(),
		e.getId() );
}
- Each node and edge allows to iterate on its neighbourhood.
Toolkit
is a collection of often used methods and small algorithms.
Basic tasks with GS
You can iterate on directed edges:
Node node = getRandomNode(graph);
Iterator<? extends Edge> edges = node.getLeavingEdgeIterator();
Or:
Iterator<? extends Edge> edges = node.getEnteringEdgeIterator();
And get the node degree, entering or leaving:
System.out.println(“Node degree %d (entering %d, leaving %d)%n”,
	node.getDegree(),
	node.getInDegree(),
	node.getOutDegree());
Tutorial 2
A first dynamic graph
A first dynamic graph
- Each graph is a source of events.
- You can connect to any source using the
Source.addSink(Sink)
method. - You can choose to receive only events concerning the graph structure with
addElementSink(ElementSink)
. Elements are nodes and edges. - You can choose to receive only events concerning data attributes stored on elements with
addAttributeSink(AttributeSink)
. - A
Sink
is only an empty interface inheritingElementSink
andAttributeSink
.
A first dynamic graph
An element sink must follow the interface:
public interface ElementSink {
	void nodeAdded( ... );
	void nodeRemoved( ... );
	void edgeAdded( ... );
	void edgeRemoved( ... );
	void graphCleared( ... );
	void stepBegins( ... );
}
A first dynamic graph
An attribute sink must follow the interface:
public interface AttributeSink {
	void graphAttributeAdded( ... );
	void graphAttributeChanged( ... );
	void graphAttributeRemoved( ... );

	void nodeAttributeAdded( ... );
	void nodeAttributeChanged( ... );
	void nodeAttributeRemoved( ... );

	void edgeAttributeAdded( ... );
	void edgeAttributeChanged( ... );
	void edgeAttributeRemoved( ... );
}
A first dynamic graph
A source is an interface that only defines methods to handle a set of sinks.
public interface Source {
	void addSink(Sink sink);
	void removeSink(Sink sink);
	void addAttributeSink(AttributeSink sink);
	void removeAttributeSink(AttributeSink sink);
	void addElementSink(ElementSink sink);
	void removeElementSink(ElementSink sink);
	void clearElementSinks();
	void clearAttributeSinks();
	void clearSinks();
}
A first dynamic graph


A first dynamic graph
- As the graph is also a sink, you could use these methods to create the graph.
- But a better way is to send graph events using an existing source, like a file.
- Few graph file formats are dynamic.
- GraphStream provides a format named DGS that allows to store and load dynamic graphs.
A first dynamic graph
A DGS file looks like this. You can find it in the data > tutorial2.dgs
DGS003
"Tutorial 2" 0 0
an "A"
an "B"
an "C"
ae "AB" "A" "B"
ae "BC" "B" "C"
ae "CA" "C" "A"
ce "AB" label="AB"
ce "BC" label="BC"
ce "CA" label="CA"
an
add a node andae
an edge.ae "AB" "A" > "B"
adds a directed edge.cn
,ce
andcg
change or add one or more attributes on a node, edge or graph.dn
andde
allow to remove nodes, edges.
A first dynamic graph
- Each change in the graph is an event.
- However you may want to define a notion of time, and group some events as occurring "at the same time".
- You can do this using a
step
. - The DGS notion for steps is
st <number>
.
A first dynamic graph
The ability to remove nodes and edges make the format dynamic.
Add this to the previous DGS file:
st 2
an "D"
an "E"
ae "BD" "B" "D"
ae "CE" "C" "E"
ae "DE" "D" "E"
de "AB"
dn "A"
st 3
And save it.
A first dynamic graph
- We will now read this file.
- This can be done in one simple operation :
graph.read("tutorial2.dgs");
- However this will "play" all events as fast as possible.
- We have no control over the speed at which events occur.
- This form of reading is an utility method of the
Graph
interface allowing to read static graphs from all the supported file formats.
A first dynamic graph
We can read the DGS file event by event using an input source:
public class Tutorial2 {
	public static void main(String args[]) {
		Graph graph = new SingleGraph("Tutorial2");
		graph.display();
		graph.addAttribute("ui.antialias");
		try {
			FileSource source = FileSourceFactory.sourceFor(
				"tutorial2.dgs");
			source.addSink(graph);
			source.begin("tutorial2.dgs");
			while(source.nextEvents());
			source.end();
		} catch(Exception e) { e.printStackTrace(); }
	}
}
A first dynamic graph
- We read the file event by event (line by line in the file), however it still does it as fast as it can.
- Note the line
while(source.nextEvents());
that does the job. - Also note that we have to call the
begin()
andend()
methods before and after reading to cleanly open and close the file.
while(source.nextEvents()) {
	Thread.sleep(1000);
}
We can also run it step by step so that events between two step appear together
while(source.nextStep()) {
	Thread.sleep(1000);
}
A first dynamic graph
- The graph is automatically reshaped for you.
- However you may want to position nodes by yourself.
- You can do this using the
x
andy
attributes:
an "A" x=0 y=1
an "B" x=1 y=-1
an "C" x=-1 y=-1
And:
an "D" x=1 y=1
an "E" x=-1 y=1
A first dynamic graph
You have to tell the viewer it should not place nodes for you:
graph.display(false);
You can now run the program anew.
Slides and Material
Get the Slides and Materials online:
NeX2015)